Developer Documentation
If you are new to developing 21cmFAST, please read the Contributing
section first, which outlines the general concepts for contributing to development,
and provides a step-by-step walkthrough for getting setup.
This page lists some more detailed notes which may be helpful through the
development process.
Compiling for debugging
When developing, it is usually a good idea to compile the underlying C code in DEBUG
mode. This may allow extra print statements in the C, but also will allow running the C
under valgrind or gdb. To do this:
$ DEBUG=True pip install -e .
See Installation for more installation options.
Developing the C Code
In this section we outline how one might go about modifying/extending the C code and ensuring that the extension is compatible with the wrapper provided here. It is critical that you run all tests after modifying _anything_ (and see the section below about running with valgrind). When changing C code, before testing, ensure that the new C code is compiled into your environment by running:
$ rm -rf build
$ pip install .
Note that using a developer install (-e) is not recommended as it stores compiled objects in the working directory which don’t get updated as you change code, and can cause problems later.
There are two main purposes you may want to write some C code:
An external plugin/extension which uses the output data from 21cmFAST.
Modifying the internal C code of 21cmFAST.
21cmFAST currently provides no support for external plugins/extensions. It is entirely
possible to write your own C code to do whatever you want with the output data, but we
don’t provide any wrapping structure for you to do this, you will need to write your
own. Internally, 21cmFAST uses the cffi library to aid the wrapping of the C code into
Python. You don’t need to do the same, though we recommend it. If your desired
“extension” is something that needs to operate in-between steps of 21cmFAST, you can use
the generators or single-field fucntions (see tutorials/coeval_cubes) to stop your
calculation at the desired point, making any modifications to the structures before continuing
the run.
Modifying the C-code of 21cmFAST should be relatively simple. If your changes are
entirely internal to a given function, then nothing extra needs to be done. A little
more work has to be done if the modifications add/remove input parameters or the output
structure. If any of the input structures are modified (i.e. an extra parameter
added to it), then the corresponding class in py21cmfast.wrapper must be modified,
usually simply to add the new parameter to the existing attributes using any desired
functionality provided in the attrs package.
For instance, if a new variable some_param was added to the matter_params struct
in the ComputeInitialConditions C function, then the MatterParams class in
the wrapper would be modified, adding``some_param=attrs.field(default=<your_value_here>)``
to the class. If the default value of the parameter is dependent on another parameter, it
should be placed after it’s depenencies in the structure, and be given a default function
vit the attrs default decorator e.g:
@DIM.default
def _dim_default(self):
    return 3 * self.HII_DIM
Here we return either the explicitly set DIM, or 3 by the HII_DIM. In addition, if the
new parameter is not settable – if it is completely determined by other parameters – mark it as
private with a leading underscore or make it a @property of the class.
If you modify an output struct, which usually house a number of array quantities
(often float pointers, but not necessarily), then you’ll again need to modify the
corresponding class in the wrapper. In particular, you’ll need to add an entry for that
particular array as an _arrayfield() to the attributes the class and set its shape in the new()
method. Any output which depends on the new array must also have it added to its
get_required_input_arrays() method.
If the C backend uses new input or output fields, they must be added to the structs
in the header files _inputparams_wrapper.h or _outputstructs_wrapper.h.
C Function Standards
The C-level functions are split into two groups – low-level “private” functions, and
higher-level “public” or “API” functions. All API-level functions are callable from
python (but may also be called from other C functions). All API-level functions are
currently prototyped in _functionprototypes_wrapper.h.
To enable consistency of error-checking in Python (and a reasonable standard for any
kind of code), we enforce that any API-level function which computes an output structure must return an integer status.
In addition, any “return” objects must be modified in-place (i.e. passed as pointers). This enables
Python to control the memory access of these variables, and also to receive proper
error statuses (see below for how we do exception handling). We also adhere to the
convention that “output” variables should be passed to the function as its last
argument(s). In the case that _only_ the last argument is meant to be “output”, there
exists a simple wrapper _call_c_simple in wrapper/_utils.py that will neatly handle the
calling of the function in an intuitive pythonic way.
Coordinate Systems & Grid Resolution
21cmFAST Uses two grid resolutions specified in SimulationOptions during the simulation: A high-resolution DIM
used to specify the InitialConditions, which is downsampled to HII_DIM in the PerturbedField and is used
for all other fields. The two grids are aligned as follows (using a ratio of DIM / HII_DIM = 4 as an example):
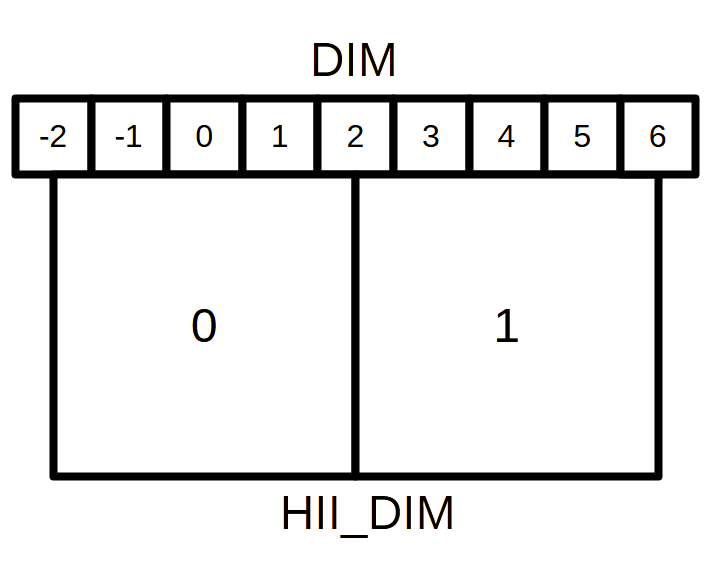
When the ratio of the two grid dimensions is an integer, the centres of the low-resolution grid cells will always align with the centre of a high resolution cell. This allows us to easily downsample the grids using Fourier-space filters, since we can always place a low-pass filter at the centre of a high-resolution cell.
Continuous positions such as HaloCatalog.halo_coords are specified on the range [0, BOX_LEN]. And wrapping occurs such that
the low-resolution cell at index 0 will contain the coordinates [BOX_LEN(1 - 1/(2*HII_DIM)), BOX_LEN]
and [0, BOX_LEN/(2*HII_DIM)].
Functions and macros regarding indexing and positioning in both continuous space and discrete grids can be found
in indexing.c and indexing.h.
Performance and Memory Profiling
The simplest way to profile the code is using the package py-spy <https://github.com/benfred/py-spy> and speedscope <https://speedscope.app>, simply install py-spy and run
py-spy record --format speedscope -o [PATH_TO_PROFILE].json -- python [YOUR_PYTHON_SCRIPT].py.
Then drag the output JSON file into the speedscope web app to visualize the profiling data.
Profiling the backend functions requires you to pass the --native flag to py-spy, and more
information will be available if you set PROFILE=TRUE when compiling 21cmFAST, which enables debug symbols.
(Note 12/08/25: We have found that some versions of py-spy may have issues using the the --native flag, displaying stack errors.
if you encounter this, try installing 21cmFAST and py-spy on a Python 3.11 environment.)
Memory usage can also be profiled simply using memray <https://github.com/bloomberg/memray>. After installing memray:
memray run -o [PATH_TO_PROFILE] python [YOUR_PYTHON_SCRIPT].pymemray flamegraph [PATH_TO_PROFILE]
This will generate a HTML file that can be opened in a web browser to visualize memory usage.
Running with gperftools
profiling can also be achieved using gperftools by compiling 21cmfast with the PROFILE flag
then calling whichever script you use to run 21cmFAST with the CPUPROFILE environment variable
env CPUPROFILE=[PATH-TO-PROFILE] python some_script.py
Profiles may then be viewed using pprof, and the shared library file (located in the build directory
after compiling), see https://gperftools.github.io/gperftools/cpuprofile.html for more information on pprof.
Profile graphs may have unnamed functions at the top-level, representing the wrapper. However the lower-level
functions will be mapped correctly.
Running with Valgrind
Much more detailed performance statistics can be obtained using valgrind, which explicitly
checks for memory leaks. To do this, install valgrind (we have tested v3.14+),
which is probably available via your package manager. We provide a
suppression file for valgrind in the devel/ directory of the main repository.
It is ideal if you install a development-version of python especially for running these tests. To do this, download the version of python you want and then configure/install with:
$ ./configure --prefix=<your-home>/<directory> --without-pymalloc --with-pydebug --with-valgrind
$ make; make install
Construct a virtualenv on top of this installation, and create your environment,
and install all requirements.
If you do not wish to run with a modified version of python, you may continue with your
usual version, but may get some extra cruft in the output. If running with Python
version > 3.6, consider running with environment variable PYTHONMALLOC=malloc
(see https://stackoverflow.com/questions/20112989/how-to-use-valgrind-with-python ).
The general pattern for using valgrind with python is:
$ valgrind --tool=memcheck --track-origins=yes --leak-check=full --suppressions=devel/valgrind-suppress-all-but-c.supp <python script>
One useful command is to run valgrind over the test suite (from the top-level repo directory):
$ valgrind --tool=memcheck --track-origins=yes --leak-check=full --suppressions=devel/valgrind-suppress-all-but-c.supp pytest
While we will attempt to keep the suppression file updated to the best of our knowledge so that only relevant leaks and errors are reported, you will likely have to do a bit of digging to find the relevant parts.
Valgrind will likely run very slowly, and sometimes you will know already which exact tests are those which may have problems, or are relevant to your particular changes. To run these:
$ PYTHONMALLOC=malloc valgrind --tool=memcheck --track-origins=yes --leak-check=full --suppressions=devel/valgrind-suppress-all-but-c.supp pytest -v tests/<test_file>::<test_func> > valgrind.out 2>&1
Note that we also routed the stderr output to a file, which is useful because it can be
quite voluminous. There is a python script, devel/filter_valgrind.py which can be run
over the output (valgrind.out in the above command) to filter it down to only have
stuff from 21cmfast in it.
Producing Integration Test Data
There are bunch of so-called “integration tests”, which rely on previously-produced
data. To produce this data, run python tests/produce_integration_test_data.py.
Furthermore, this data should only be produced with good reason – the idea is to keep it static while the code changes, to have something steady to compare to. If a particular PR fixes a bug which affects a certain tests’ data, then that data should be re-run, in the context of the PR, so it can be explained.
Logging in C
The C code has a header file logging.h. The C code should never contain bare
print-statements – everything should be formally logged, so that the different levels
can be printed to screen correctly. The levels are defined in logging.h, and include
levels such as INFO, WARNING and DEBUG. Each level has a corresponding macro
that starts with LOG_. Thus to log run-time information to stdout, you would use
LOG_INFO("message");. Note that the message does not require a final newline character.
While there are several exceptions, a rule-of-thumb is to use DEBUG for output structure
level information (printed once per compute functino), SUPER_DEBUG for smaller loop
information (such as things once per filter radius), and ULTRA_DEBUG for individual cells
(hopefully not every cell).
Exception handling in C
There are various places that things can go wrong in the C code, and they need to be
handled gracefully so that Python knows what to do with it (rather than just quitting!).
We use the simple cexcept.h header file from http://www.nicemice.net/cexcept/ to
enable a simple form of exception handling. That file itself should not be edited.
There is another header – exceptions.h – that defines how we use exceptions
throughout 21cmFAST. Any time an error arises that can be understood, the developer
should add a Throw <ErrorKind>; line. The ErrorKind can be any of the kinds
defined in exceptions.h (eg. GSLError or ValueError). These are just integers.
Any C function that computes an output struct – must be globally wrapped in
a Try {} Catch(error_code) {} block. See GenerateICs.c for an example.
Most of the code should be in the Try block.
Anything that does a Throw at any level of the call stack within that Try will
trigger a jump to the Catch. The error_code is the integer that was thrown.
Typically, one will perhaps want to do some cleanup here, and then finally return the
error code.
Python knows about the exit codes it can expect to receive, and will raise Python
exceptions accordingly. From the python side, two main kinds of exceptions could be
raised, depending on the error code returned from C. The lesser exception is called a
ParameterError, and is supposed to indicate an error that happened merely because
the parameters that were input to the calculation were just too extreme to handle.
In the case of something like an automatic Monte Carlo algorithm that’s iterating over
random parameters, one would usually want to just keep going at this point, because
perhaps it just wandered too far in parameter space.
The other kind of error is a FatalCError, and this is where things went truly wrong,
and probably will do for any combination of parameters.
If you add a kind of Exception in the C code (to exceptions.h), then be sure to add
a handler for it in the _process_exitcode function in wrapper.py.
Maintaining Array State
Part of the challenge of maintaining a nice wrapper around the fast C-code is keeping
track of initialized memory, and ensuring that the C structures that require that memory
are pointing to the right place. Most of the arrays that are computed in 21cmFAST
are initialized in Python (using Numpy), then a pointer to their memory is given to
the C wrapper object.
To make matters more complicated, since some of the arrays are really big, it is sometimes necessary to write them to disk to relieve memory pressure, and load them back in as required. That means that any time, a given array in a C-based class may have one of several different “states”:
Completely Uninitialized
Allocated an initialized in memory
Computed (i.e. filled with the values defining that array after computation in C)
Stored on disk
Stored and in memory.
It’s important to keep track of these states, because when passing the struct to the compute()
function of another struct (as input), we go and check if the array exists in memory, and
initialize it. Of course, we shouldn’t initialize it with zeros if in fact it has been computed already
and is sitting on disk ready to be loaded. Thus, the OutputStruct tries to keep track of these
states for every array in the structure, using the Array and ArrayState classes. Every write/read/compute/purge
operation self-consistently modifies the status of the array.
It has been made difficult to unintnetionally modify the data in an array without properly changing the state. Arrays are frozen structures, so one must use the methods provided to alter their values or states.
Purging/Loading C-arrays to/from Disk
As of v3.1.0, there are more options for granular I/O, allowing large arrays to be purged from memory
when they are unnecessary for further computation. As a developer, you should be aware of the _get_required_input_arrays
method on all OutputStruct subclasses. This is available to tell the given class what arrays need to
be available at compute time in any of the input structs. For example, if doing PERTURB_ON_HIGH_RES,
the PerturbedField requires the hi-res density fields in InitialConditions. This gives indications
as to what boxes can be purged to disk (all the low-res boxes in the ICs, for example).
Currently, this is only used to check that all boxes are available at compute time, and is not used
to actually automatically purge anything. Note however that InitialConditions does have two
custom methods that will purge unnecessary arrays before computing perturb fields or ionization fields.
Note
If you add a new quantity to a struct, and it is required input for other structs, you need
to add it to the relevant _get_required_input_arrays methods.
Further note that as of v3.1.0, partial structs can be written and read from disk (so you can specify
keys=['hires_density'] in the .read() method to just read the hi-res density field into the object.
Branching and Releasing
The aim is to make 21cmFAST’s releases as useful, comprehendible, and automatic as possible. This section lays out explicitly how this works (mostly for the benefit of the admin(s)).
Versioning
The first thing to mention is that we use strict semantic versioning
(since v2.0). Thus the versions are MAJOR.MINOR.PATCH, with MAJOR including
API-breaking changes, MINOR including new features, and PATCH fixing bugs or
documentation etc. If you depend on hmf, you can set your dependency as
21cmFAST >= X.Y < X+1 and not worry that we’ll break your code with an update.
To mechanically handle versioning within the package, we use
setuptools-scm. This stores the version
in the git tag. There are many benefits to this – one is that the version is unique
for every single change in the code, with commits on top of a release changing the
version. This means that versions accessed via py21cmfast.__version__ are unique and track
the exact code in the package (useful for reproducing results). To get the current
version from command line, simply do python -m setuptools-scm in the top-level
directory.